Sea Minor, a John Welsford Navigator.

This blog is about Sea Minor. I'm not sure about the name but that is what she was been called by the man who built her and changing a boat's name is a tricky business because you have to avoid upsetting Poseidon the god of the sea.

Sea Minor is a Navigator, a boat designed by John Welsford. Her vital statistics are: overall length 4.5m (14ft 9in), beam 1.8m (5ft 10in) and design weight is 140kg (309lbs). You can read more about this design at http://www.jwboatdesigns.co.nz/plans/navigator/index.htm.

If you would to contact me please Click to Send me Email

Saturday 31 December 2011

Forward Seat Compartment

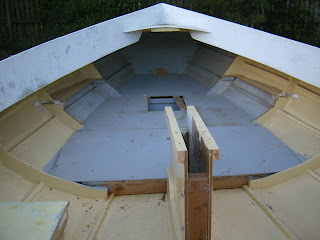
Despite interruptions I've made good progress on the seat compartment between bulkheads 2 and 3. Here's a photo showing the state of things at the end of New Year's Eve.


The clamps are holding doubler strips to the backs of the remains of the original panels. Tomorrow's job is to shape the plywood panels for the new front and top of the seat.  I will glue the seat front in place and then paint the inside of the compartment before glueing the top down (epoxy on the bare wood then paint over everything).

The original mast step was on the keel and I am moving it up onto the seat top. The new plywood spine betweem bulkheads 2 and 3 has substantial ribs either side of it to support the load from the mast. The heavy ply top to this spine will transfer the longitudinal forces to the two bulkheads and the seat top, when it is glued down, will handle the transverse loads. This ply top will also be connected to the centreboard case by a continuation of the vertical spine and a horizontal "beam".

The photo below shows the original hole in the deck that the mast fitted through. It is plugged because it is about 50 mm forward of where it should be (click on the photo to enlarge it and you will see my marks showing where the centre of the hole should be). I will shape a piece of ply to glue down onto the deck and then cut a U shaped opening so the mast can be stepped and pushed up into the U without having to lift it to the vertical and pass it down through the hole in the deck.

Thursday 29 December 2011

Bulkhead 2 and Transom Stuff

Here's a photo of bulkhead 2 with the new ply glued in place. It needs some cosmetic work around the join once the temporary screws are removed. I took the opportunity, while the hole was open, to clean up the space behind bulkhead 2 and gave it a couple of coats of paint.


With bulkhead 2 in place I checked the position of the mast step and the mast hole in the deck. Both are further forward than they should be and their relative position is such that the mast will be closer to the vertical than designed. I will follow John Welsford's advice and put the mast where it should be.

The transom was damaged where the rudder pintles attached. The ply was cracked but probably still watertight. The photo below shows a new piece of ply glued to the inside of the transom below the seat. Also visible (just) is the new step for the mizzen mast; not visible are the new doublers,below the deck and seat, around the mizzen mast holes (there were none there).

I am replacing some of the stern seat and the frame work is in place to support the new ply.


I added a ply doubler over the damaged transom on the outside. Not very elegant but much stronger than the original.

Tuesday 27 December 2011

Trial Fitting the New Centrecase

I have made a new centrecase according to the plans but also paying attention to the size of the hole in the bottom of the boat (wider at the front and longer than standard but these variations are only around 2 mm). While I had the centrecase on the bench I tried the centreboard in it so that there would be any nasty surprises down the track. It fitted OK with small clearances from side to side and enough room to swing up.
While looking at the centreboard and the plans I noticed that it isn't shaped as per the drawing. Here is a photo of the top of the board. Note that there is a step in the leading edge of the board where it changes from the parallel top to the profiled lower section. The plans show a straight taper from the transition line to a point above the hole. This flat face would fit against the inside of the forward end log and hold the board at a slight trailing angle to the water line - this is how it appears on the drawing. Without this taper on the upper part of the leading edge the board will hang down more vertically and I am wondering how much of a problem this will be.


In the  next photo a piece of ply shows approximately how much is missing from my centreboard. As well as the missing stuff on the leading edge the top should be parallel to the pencil line. I'm less concerned about that part because what is there looks as if it is strong enough.


Last photo shows the centrecase in place in the boat. At that time it was only held together by a couple of screws and still has to be scribed to fit the curved bottom.

Thursday 22 December 2011

Into the Workshop

After 2 days of rearranging and throwing stuff out there was enough room in the shed for Sea Minor. She will be in there for at least a month while I do the necessary woodwork and a complete repaint before she can go for a sail.

A couple of pictures show that she fits in the space with enough room to walk all round. There is still a bit of tidying up to do in the shed and a lot more to do with the stuff that has been evicted!


As you can see she fits nicely on the building frame that was used for my Acorn 15.


The photo below shows what is left of bulkhead 2. There was a seat in front of this bulkhead, where bulkhead 2 changes from yellow to grey, that was also cut away. The first jobs are to repaint the inside of the compartment behind bulkhead 2 and make a pattern for the plywood to fill the hole. The round hole is in bulkhead 1 to allow ventilation of the space.

Saturday 17 December 2011

The Boat Arrives At Home

Collected the boat this afternoon and brought it home. Put the sails up and took a picture of the whole package. Note that there are no fittings (cleats, blocks, etc) attached to the hull, they had been removed for painting and are in a cardboard box.


The previous owner had begun work on some modifications intended to create more space in the boat. These mods are in two areas: the centreboard was to be replaced by a dagger board and the forward bulkheads have been cut away to create more space.

Here are some photos of the remains of the CB case.


The next photos show the remains of the forward bulkheads. The grey boards are a false floor that appears to be held in place by screws.


Finally, a photo looking aft. There is a lot of room in the cockpit of this Navigator.